本文最后更新于:2021年6月15日 晚上
前言: 以前做项目用的都是开源的分布式系统,如FastDFS。
最近几年,随着云的发展,国内外的巨头公司也相应的推出了相关商用的类似产品。
比如Amazon S3,阿里云的OSS,腾讯云的COS。
今天我选择使用阿里云的OSS来作为例子,来实现图片的上传。
准备工作
阿里云OSS官方文档地址
一、开通阿里云OSS
- 登录阿里云控制台开通OSS服务,并创建
AccessKeyId和AccessKeySecret
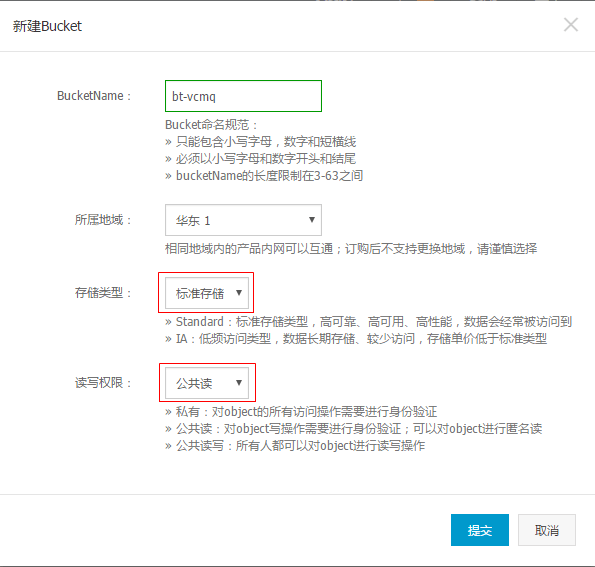
- 在OSS控制面板上新建Bucket

- 进入新建的Bucket
选择左侧的Object管理,新建一个img的文件夹,便于存储归类
二、maven项目中引入依赖
在maven工程中的pom.xml添加依赖
| <dependency>
<groupId>com.aliyun.oss</groupId>
<artifactId>aliyun-sdk-oss</artifactId>
<version>2.6.0</version>
</dependency>
|
编写代码
注:我所使用的的框架是:SpringMVC+Spring+Mybatis
一、上传文件到OSS之HelloWorld
上传图片之前,先惯例来一个HelloWorld示例!
1
2
3
4
5
6
7
8
9
10
11
12
13
14
15
16
17
18
19
20
21
22
23
24
25
26
27
28
29
30
31
32
33
34
35
36
37
38
39
40
41
| import com.aliyun.oss.OSSClient;
import com.aliyun.oss.model.ObjectMetadata;
import com.aliyun.oss.model.PutObjectResult;
import com.nullpointer.common.Constants;
import com.nullpointer.service.AliyunOSSService;
import org.springframework.stereotype.Service;
import org.springframework.web.multipart.MultipartFile;
import javax.annotation.PostConstruct;
import java.io.File;
import java.io.IOException;
import java.io.InputStream;
@Service
public class AliyunOSSServiceImpl implements AliyunOSSService {
public static final String IMG = "img/";
private static final int maxLength = 5 * 1024 * 1024;
public static final String ENDPOINT = File.separatorChar == '/' ? "oss-cn-hangzhou-internal.aliyuncs.com" : "http://oss-cn-hangzhou.aliyuncs.com";
private OSSClient client;
private static String bucketName;
@PostConstruct
public void init() {
String accessId = "xxxxxxxxxxxxx";
String accessKey = "xxxxxxxxxxxxxxxxx";
bucketName = "xxxxx";
client = new OSSClient(ENDPOINT, accessId, accessKey);
}
public String uploadIm() {
String content = "Hello OSS";
PutObjectResult test01 = client.putObject(bucketName, "test01", new ByteArrayInputStream(content.getBytes()));
return test01.getETag();
}
}
|
打开OSS控制台的Object管理,是不是发现新增了一个文件呢?

二、编写图片上传服务类
HelloWorld示例完成了,开始正式编写图片上传代码了。注释都有。
1
2
3
4
5
6
7
8
9
10
11
12
13
14
15
16
17
18
19
20
21
22
23
24
25
26
27
28
29
30
31
32
33
34
35
36
37
38
39
40
41
42
43
44
45
46
47
48
49
50
51
52
53
54
55
56
57
58
59
60
61
62
63
64
65
66
67
68
69
70
71
72
73
74
75
| @Service
public class AliyunOSSServiceImpl implements AliyunOSSService {
public static final String IMG = "img/";
private static final int maxLength = 5 * 1024 * 1024;
public static final String ENDPOINT = File.separatorChar == '/' ? "oss-cn-hangzhou-internal.aliyuncs.com" : "http://oss-cn-hangzhou.aliyuncs.com";
private OSSClient client;
private static String bucketName;
@PostConstruct
public void init() {
String accessId = "xxxxxxxxxxxxx";
String accessKey = "xxxxxxxxxxxxxxxxx";
bucketName = "xxxxx";
client = new OSSClient(ENDPOINT, accessId, accessKey);
}
@Override
public String saveImage(MultipartFile file) {
try {
String fileName = this.saveImage(file.getSize(), file.getOriginalFilename(), file.hashCode(), file.getInputStream());
return getHttpUrl(fileName);
} catch (IOException e) {
e.printStackTrace();
}
return null;
}
private String getHttpUrl(String fileName) {
return Constants.OSS_HTTP + "/" + IMG + fileName;
}
@Override
public String saveImage(long size, String extName, int hashCode, InputStream is) {
if (size > maxLength)
return null;
String name = extName.toLowerCase();
name = name.substring(name.indexOf("."));
String fileName = System.currentTimeMillis() + "_" + hashCode + name;
return this.saveImage(size, fileName, is);
}
@Override
public String saveImage(long size, String fileName, InputStream is) {
String key = IMG + fileName;
this.uploadObject(key, size, is);
return fileName;
}
@Override
public void uploadObject(String key, long size, InputStream is) {
ObjectMetadata metadata = new ObjectMetadata();
metadata.setContentLength(size);
metadata.setContentType("image/jpeg");
PutObjectResult result = client.putObject(bucketName, key, is);
System.out.println(result);
}
}
|
三、编写Controller层的上传接口
| @RequestMapping(value = "/upload", method = RequestMethod.POST)
public void uploadOSS(MultipartFile pic, HttpServletResponse response, Model model) throws Exception {
String imgUrl = aliyunOSSService.saveImage(pic);
System.out.println("path = " + imgUrl);
JSONObject jsonObject = new JSONObject();
jsonObject.put("path", imgUrl);
response.setContentType("application/json;charset=UTF-8");
response.getWriter().write(jsonObject.toString());
}
|
需要注意的是:入参中的MultipartFIle是一个接口,需要在Spring的配置文件applicationContext.xml中将其实现类注入。
| <bean id="multipartResolver" class="org.springframework.web.multipart.commons.CommonsMultipartResolver"/>
|
四、编写页面JSP
1
2
3
4
5
6
7
8
9
10
11
12
13
14
15
16
17
18
19
20
21
22
23
24
25
26
27
28
29
30
31
32
33
34
35
36
37
38
| <%@ page contentType="text/html;charset=UTF-8" language="java" %>
<html>
<head>
<script src="/static/js/jquery.js" type="text/javascript"></script>
<script src="/static/js/jquery.form.js" type="text/javascript"></script>
<%@ page isELIgnored="false" %>
<title>home</title>
<script type="application/javascript">
function uploadPic() {
var options = {
url: "/upload",
type: "POST",
dataType: "json",
success: function (data) {
$("#imgUrl").attr("src", data.path);
}
}
$("#jform").ajaxSubmit(options);
}
</script>
</head>
<body>
<div class="container-fluid">
<div class="row-fluid" align="content">
<form action="/uploadOSS" method="POST" id="jform">
<div class="span12">
<img alt="img" class="img-polaroid" id="imgUrl"/>
<input type="file" name="pic" onchange="uploadPic()"/>
</div>
</form>
</div>
</div>
</body>
</html>
|
页面不是我所擅长,能显示效果即可。
五、测试图片上传
启动项目,进入图片上传的页面。

上传图片
控制台打印了如下内容:

页面显示:


