和我一起打造个简单搜索之ElasticSearch集群搭建

本文最后更新于:2021年6月15日 晚上

我们所常见的电商搜索如京东,搜索页面都会提供各种各样的筛选条件,比如品牌、尺寸、适用季节、价格区间等,同时提供排序,比如价格排序,信誉排序,销量排序等,方便了用户去找到自己心里理想的商品。

站内搜索对于一个网站几乎是标配,只是搜索的强大与否的区别,有的网站只支持关键词模糊搜索,而淘宝,京东提供了精细的筛选条件,同时支持拼音搜索等更方便的搜索方式。

由于笔者在一家做网络文学的公司工作,所以实现就是以小说为商品的搜索,具体可以参考起点网小说的搜索。

如图所示,起点网的搜索提供了关键词搜索和排序条件以及筛选条件,接下来,我们一起来实现这个吧~

环境

本文以及后续 es 系列文章都基于 5.5.3 这个版本的 elasticsearch ,这个版本比较稳定,可以用于生产环境。

系列文章

环境准备之 ES 集群搭建

master 配置

1
2
3
4
5
6
7
8
9
10
11
12
13
14
15
16
17
18
19
20
21
22
23
24
25
26
27
28
29
30
31
32
33
34
35
## 下载 elasticsearch
wget https://artifacts.elastic.co/downloads/elasticsearch/elasticsearch-5.5.3.tar.gz

## 创建目录
mkdir /usr/local/es

## 解压文件到 es 目录
tar -xvf elasticsearch-5.5.3.tar.gz -C /usr/local/es

## 修改 es 的配置文件
cd /usr/local/es/elasticsearch-5.5.3/config

vim elasticsearch.yml

## 在文件末尾增加

http.cors.enabled: true
http.cors.allow-origin: "*"
cluster.name: es-search
node.name: slave1
node.master: true
network.host: 0.0.0.0

## 修改 es 的 jvm 设置,如果不调节,可能启动一个 master, slave 就没足够内存来启动了

vim jvm.options

修改
-Xms2g
-Xmx2g

-Xms512m
-Xmx512m

注意,如果是线上,这个内存就不要修改了,使用默认的内存 2G 即可。

slave 配置

1
2
3
4
5
6
7
8
9
10
11
12
13
14
15
16
17
18
19
20
21
22
23
24
25
26
27
28
29
30
31
32
33
34
35
36
## 准备搭建一个伪集群 1个master + 2个slave
cd /usr/local/es

## 将目录重命名为 master
[root@localhost es]# mv elasticsearch-5.5.3/ master

##拷贝两份为 slave
[root@localhost es]# cp -r master/ slave1
[root@localhost es]# cp -r master/ slave2


## 修改两个 slave 的配置

### 修改 slave1 的配置
[root@localhost es]# vim slave1/config/elasticsearch.yml

http.cors.enabled: true
http.cors.allow-origin: "*"
cluster.name: es-search
node.name: slave1
## 注意 http 端口不要设置一样,以免冲突
http.port: 8200
#node.master: true
network.host: 0.0.0.0

### 修改 slave2 的配置
[root@localhost es]# vim slave2/config/elasticsearch.yml

http.cors.enabled: true
http.cors.allow-origin: "*"
cluster.name: es-search
node.name: slave2
## 注意 http 端口不要设置一样,以免冲突
http.port: 7200
#node.master: true
network.host: 0.0.0.0

添加用户

1
2
3
4
5
6
7
8
9
## 启动 es 不能使用 root 用户,所以先需要增加新的用户

[root@localhost es]# adduser esuser
[root@localhost es]# chown -R esuser /usr/local/es/

## 切换到 esuser 用户
[root@localhost es]# su esuser
[esuser@localhost es]$ chmod 777 /usr/local/es/

启动集群中的 master

1
2
3
4
5
6
7
8
9
10
11
12
13
14
15
16
17
18
19
20
21
22
23
24
25
26
27
28
29
30
31
32
33
34
35
36
37
38
39
40
41
42
# 先测试能否正常启动
[esuser@localhost es]$ /usr/local/es/master/bin/elasticsearch

# 查看打印的日志信息
[2018-09-02T01:45:21,125][INFO ][o.e.g.GatewayService ] [master] recovered [0] indices into cluster_state
[2018-09-02T01:45:21,138][INFO ][o.e.h.n.Netty4HttpServerTransport] [master] publish_address {127.0.0.1:9200}, bound_addresses {127.0.0.1:9200}
[2018-09-02T01:45:21,138][INFO ][o.e.n.Node ] [master] started


## 启动失败提示
ERROR: [2] bootstrap checks failed
[1]: max file descriptors [4096] for elasticsearch process is too low, increase to at least [65536]
[2]: max virtual memory areas vm.max_map_count [65530] is too low, increase to at least [262144]

## 切换到 root 用户,修改系统配置
su root
# 输入登录密码

vim /etc/security/limits.conf

## 在文件末尾增加,不要去掉前面的 * 号

* soft nofile 300000
* hard nofile 300000
* soft nproc 102400
* soft memlock unlimited
* hard memlock unlimited

## 对 sysctl.conf 文件 进行修改
echo "vm.max_map_count=262144" > /etc/sysctl.conf
sysctl -p

## 修改完毕,切换回 esuser 用户身份
su esuser

## 尝试启动
[esuser@localhost es]$ /usr/local/es/master/bin/elasticsearch

# 提示已经启动成功了
[2018-09-02T02:10:14,285][INFO ][o.e.h.n.Netty4HttpServerTransport] [master] publish_address {192.168.199.192:9200}, bound_addresses {[::]:9200}
[2018-09-02T02:10:14,285][INFO ][o.e.n.Node ] [master] started
[2018-09-02T02:10:14,289][INFO ][o.e.g.GatewayService ] [master] recovered [0] indices into cluster_state

验证启动

使用浏览器访问 http://ip:9200 ip 替换你的 ip 地址,我的是 http://192.168.199.192:9200

浏览器响应内容

1
2
3
4
5
6
7
8
9
10
11
12
13
{
name: "master",
cluster_name: "es-search",
cluster_uuid: "JoNUMEKFS06NHNS7p3bdWg",
version: {
number: "5.5.3",
build_hash: "9305a5e",
build_date: "2017-09-07T15:56:59.599Z",
build_snapshot: false,
lucene_version: "6.6.0"
},
tagline: "You Know, for Search"
}

注意:如果无法访问,请关闭防火墙

后台守护进程启动 es 集群

前文是直接启动,如果按下 ctrl + c 或者结束 ssh 会话,es 会立即停止退出,因此需要通过守护进程后台启动

1
2
3
4
5
6
7
8
9
10
11
12
13
14
15
16
17
18
19
20
21
22
23
24
25
26
27
28
29
30
31
32
33
34
35
36
37
38
39
40
41
42
43
44
45

[esuser@localhost es]$ /usr/local/es/master/bin/elasticsearch -d

## 查看是否启动成功
ps -ef | grep elasticsearch

## 正常可以看到一个 elasticsearch 进程

## 如前文一样,分别测试两个 slave 是否可以正常启动

### 测试slave1
[esuser@localhost es]$ /usr/local/es/slave1/bin/elasticsearch -d

### 浏览器访问 http://ip:8200,响应为:
{
"name":"slave1",
"cluster_name":"es-search",
"cluster_uuid":"JoNUMEKFS06NHNS7p3bdWg",
"version":{
"number":"5.5.3",
"build_hash":"9305a5e",
"build_date":"2017-09-07T15:56:59.599Z",
"build_snapshot":false,
"lucene_version":"6.6.0"
},
"tagline":"You Know, for Search"
}

### 测试slave2
[esuser@localhost es]$ /usr/local/es/slave2/bin/elasticsearch -d
### 浏览器访问 http://ip:8200,响应为:

{
name: "slave2",
cluster_name: "es-search",
cluster_uuid: "JoNUMEKFS06NHNS7p3bdWg",
version: {
number: "5.5.3",
build_hash: "9305a5e",
build_date: "2017-09-07T15:56:59.599Z",
build_snapshot: false,
lucene_version: "6.6.0"
},
tagline: "You Know, for Search"
}

至此完成了 es 集群(伪)的搭建。

环境准备之 elasticsearch head 安装

为了方便我们观察调试,安装这个 es 插件。

安装步骤参考官方 github

1
2
3
4
5
6
7
# 把插件安装到 es 目录下
cd /usr/local/es/

git clone git://github.com/mobz/elasticsearch-head.git
cd elasticsearch-head
npm install
npm run start

npm install 这一步,由于国内网络环境的原因,可能会失败,可以npm 换源重试。

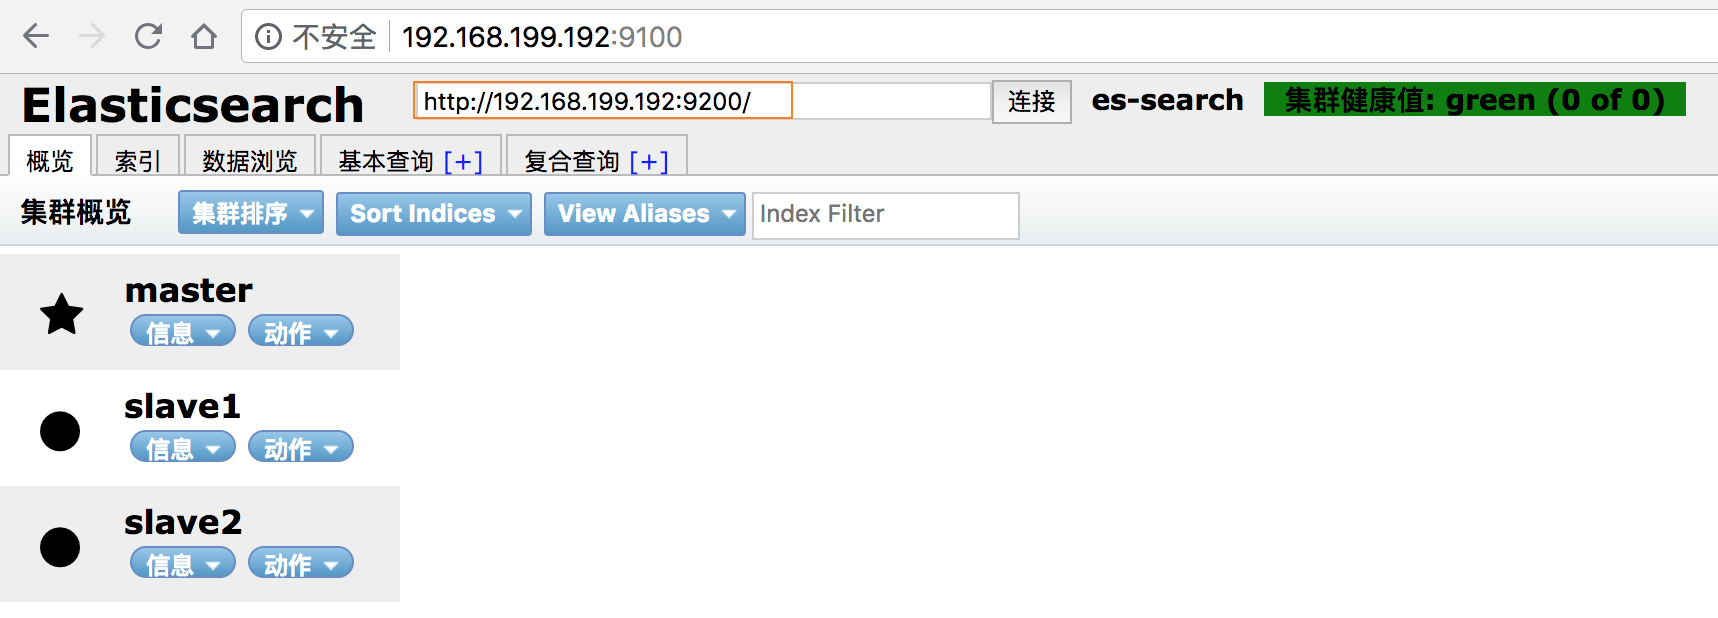
启动完成后,浏览器访问 http://ip:9100,我的是 http://192.168.199.192:9100/

这里需要修改连接地址,为你的 es 所在的 ip:9200。后面集群健康为绿色为正常。

到这里,插件也就安好了。

分词

商品搜索,分词是必不可少的,开源的中文分词最有名的莫过于 IK 分词了,同时为了给用户提供更好的体验,同时配置 pinyin 分词,即输入拼音也可以进行搜索,网上也有对应的分词器,在下文中我们一起来配置分词器。

有疑问?

欢迎来信,给我写信